Posts

Showing posts with the label Crafts/Decor

Planning a Graduation Party

Image
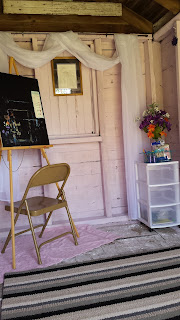
Our beautiful daughter, Faith graduated from  High School this Spring - so I wanted to have a graduation party to recognize that accomplishment... only problem was, trying to keep it simple, and not spend too much.... here's what I came up with.... Our theme was blue (her school colors), gold, silver, black, and white with pink peonies for a touch of elegance.               The Guest Table -  We had guests sign a JENGA block with a message. (If you couldn't make it, but want to still give her a note... we have lots left... let us know and we'll have you sign one!) Picture frames hung on the wall. A Vase of flowers, a card box, and a basket for the JENGA blocks on the table. We also had a quiz about the graduate for guests to fill out. You can see the quiz here. The Gift Table was pretty simple - it was the top of a garage cupboard... I glammed it up with a sign and flowers... We had her diploma, more pictures and some of her

The Best of 2016

Image
This year there were 48 blog posts at SRKindredSpirits....  There were a lot of different topics.... Things to say on a job interview , Recipes , Visiting Louisville KY , Getting rid of cookbook clutter, Book reviews , Bookcase redo , Why I don't sell , Making an orb , Crochet Christmas tree skirt , Understanding a INTJ , Adoption , DYT experiment , My first speeding ticket , What Instagram really tells you , How to review a product company, Family quality time , A free health quiz , and much more. Here's the top 10 posts of 2016: We had our first giveaway here on SRKindredSpirits and it was a success! The Happiness Dare is a highly recommended book! Once you try these, you'll be hooked! Easy and yummy... you can't go wrong with these cream cheese roll ups! I wrote this post after reading the definition of the word 'family', it will give you a little insight to my life. Getting rid of the swimming pool was personal favorite and

Crochet Pattern for Christmas Tree Skirt

Image
Materials:  (1) 16 oz Yarn (color of your choice) *You can use different colors of yarn. I wanted mine to match my Christmas stockings so I made it all soft white. Crochet Hook (I used size H) *You can use any type of yarn or any size hook.... (The smaller the hook, the tighter the stitches. The bigger the hook, the more yarn you will need.) Glossery: (ch = chain, sc = single crochet, dc = double crochet, st = stitch)                                Directions: Row 1: Ch 22, dc in fourth ch from hook, dc in each ch across, turn. Row 2: Ch 3 (counts as first dc), 2 dc in each st across to last st, dc in last st, turn.  Row 3: Ch 3, dc in each st across, turn. Row 4: Ch 3, 2 dc in each st across to last st, dc in last st, turn.  Row 5 - 6: Ch 3, dc in each st across, turn. Row 7: Ch 3, 2 dc in next st, (dc in next st, 2 dc in next st) across, turn.  Row 8 - 10: Ch 3, dc in each st across, turn. Row 11: Ch 3, (2 dc in next st,

How To Turn An Old Chicken Coop Into A She Shed

Image
We moved the chickens to the barn and turned an old chicken coop into a  'She Shed '. Our oldest daughter, Faith (15 yrs.) shares a small bedroom with her 6 yr. old little sister. There's not a lot of room, and with their nine year age difference, they don't have a lot in common. So, I thought we'd make a 'She Shed' for Faith to use as her own art studio... a place to get away, a place to relax, a place to breath. We took out the nest boxes, roosts, and all things chicken related, gave the whole thing a good scrub with Shaklee Basic H2 and Basic G to disinfect it , and let it dry. Then we mixed up  The Prairie Homestead's Whitewash  (we added 1 bottle of purple rite dye to tint it), and the kids and I got busy painting it on. We didn't quite have enough to do the floor, so left it original. I was planning on painting it white, but never got that done. (story of my life...)     It really brightened up the inside. After the

DIY Bookcase Redo

Image
It doesn't take much to give your book case a whole new makeover!  You can accomplish it with very little cost and a little bit of time. Step 1: Take everything out of the bookcase, including the shelves. Step 2: Take off the back. It is easiest if you lay the bookcase front side down on the floor.                                                     Step 3: Lay lace (you could also use material, wall paper or even paint the back a bright color.) down on the top where the back originally was. Pull snug. Step 4: Lay back on top and nail back on. Step 5: Stand upright. Place shelves back in.                                                       Step 6: Put you're books back in! Note: The key to a good looking bookcase isn't so much in the bookcase as much as it's what and how to put things in the bookcase! Group books of the same color or kind together. Have some laying down and some standing up. Add in a few collectibles (anything you l

DIY Embroidery Hoop Orb

Image
Metal Orbs are the 'in' decor item right now. Orbs come in all shapes and sizes. There are natural rope orbs, glass orbs, ceramic orbs, metal orbs, foil finish orbs, wooden orbs..…there’s an orb out there for everyone! However, some of these orbs can cost quite a pretty penny. So, if you love a well decorated home and you don't want to brake the bank... make your own wooden embroidery hoop orb. They are inexpensive, look great and are easy to make. Here's what you need: 2  embroidery hoops   per orb ( any size you want)  foam brush wood stain Instructions: 1. Disassemble each embroidery hoop. (you should have 4 total pieces) 2. Using a foam brush stain all surfaces of each embroidery hoop piece. Let dry completely.  3. Slide pieces together to form an orb as shown below.  To assemble, use the two “inside” pieces of the embroidery hoops and slide one inside the other. Add a third hoop (one of the outer edges) and tighten it closed