Posts

Showing posts with the label Crafts/Decor

DIY Bookcase Redo

Image
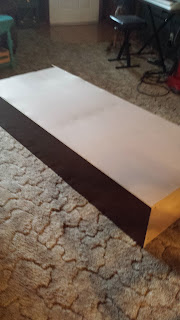
It doesn't take much to give your book case a whole new makeover!  You can accomplish it with very little cost and a little bit of time. Step 1: Take everything out of the bookcase, including the shelves. Step 2: Take off the back. It is easiest if you lay the bookcase front side down on the floor.                                                     Step 3: Lay lace (you could also use material, wall paper or even paint the back a bright color.) down on the top where the back originally was. Pull snug. Step 4: Lay back on top and nail back on. Step 5: Stand upright. Place shelves back in.                                                       Step 6: Put you're books back in! Note: The key to a good looking bookcase isn't so much in the bookcase as much as it's what and how to put things in the bookcase! Group books of the same color or kind together. Have some laying down and some standing up. Add in a few collectibles (anything you l

DIY Embroidery Hoop Orb

Image
Metal Orbs are the 'in' decor item right now. Orbs come in all shapes and sizes. There are natural rope orbs, glass orbs, ceramic orbs, metal orbs, foil finish orbs, wooden orbs..…there’s an orb out there for everyone! However, some of these orbs can cost quite a pretty penny. So, if you love a well decorated home and you don't want to brake the bank... make your own wooden embroidery hoop orb. They are inexpensive, look great and are easy to make. Here's what you need: 2  embroidery hoops   per orb ( any size you want)  foam brush wood stain Instructions: 1. Disassemble each embroidery hoop. (you should have 4 total pieces) 2. Using a foam brush stain all surfaces of each embroidery hoop piece. Let dry completely.  3. Slide pieces together to form an orb as shown below.  To assemble, use the two “inside” pieces of the embroidery hoops and slide one inside the other. Add a third hoop (one of the outer edges) and tighten it closed

DIY Serving Stands

Image
This year I made serving stands for my mom, sisters, and sister in laws for Christmas. They were so much fun to make and pretty easy too.  I started by shopping thrift stores. I tried to buy a tea cup or small dish or plate as a topper, two vases or candle holders (turned upside down) and three plates - small, medium, and large, for each serving stand. I actually didn't buy dishes with the thought of my siblings taste in colors at all - I just randomly purchased plates, and cups that I thought looked unique.... the shopping part was fun! After I got everything purchased, I took an evening and started putting different plates together. I kept trying different colors and patterns, until I got a set that I liked. Then I stacked them together and started doing the same for the next one, etc. After I decided on the colors and plates for each serving stand, I started gluing them together. I used gorilla glue for glass and pottery that dried clear. The tr

Spring Craft for Kids

Image
Today is the first day of Spring. So to kick it off with some fun, we made little bird nests. One of our favorite things about spring (besides the warm sunshine and flowers popping up), is listening to the birds chip! What you need: Small party/paper plates paper/plastic Easter grass Graham crackers Icing Peeps Little eggs (we used mini malt ball eggs) Other spring candy and edible glitter or decorating candy Brake graham crackers in half and use icing to stick them together and to the plate. Use 2 halves in an upside down v shape to make the roof. Put the Easter grass inside to make a nest. Add eggs and put a peep (aka bird) on top of the eggs. Let the kids decorate their birdhouses with the candy. (Use the icing to stick the candy on) It's  fun to see each kids creativity and the kids always have lots of fun! Enjoy!

Monagramed Book Letter

Image
Home decor doesn't have to cost much. There are many DIY projects that you can do to make your home look great! I wanted to make a letter using the initial of our last name "K"! Materials needed for project: - Letters (you can find these at hobby stores) - Old Song Book. - Hot Glue Gun - Hot Glue - Scissors 1. Like every good craft project, gather all of your materials.  2. Begin by tearing out pages of an old song book.  3. After your pages are torn out of the book, use your scissors to cut the margins and page numbers off the paper. You mainly want just words or music notes showing. 4. Roll your paper. You can either roll them tight or loose, depending on  your preference. Try to roll them approx. the same size. -I know, easier said than done! 5. As you finish rolling your paper strip, grab your hot glue gun and put a small amount of glue onto the remaining edge of your paper strip.  6. Continue rolling your strip in

Fireworks In A Glass

Image
Fireworks are a beautiful and fun part of many celebrations, but not something you want kids to make themselves. However, even very young explorers can experiment with these safe underwater 'fireworks'. I have to admit, when my oldest daughter (who loves science experiments) wanted to try this one, I wasn't too sure - but even my hubby and I thought this was pretty cool! What You Need water oil food coloring tall clear glass another cup or glass   Create Fireworks in a Glass Fill the tall glass almost to the top with room-temperature water - (about 1" from the top). Pour a little oil into the other glass. (1-2 tablespoons) Add a couple of drops of food coloring. We used one drop each of Blue, Green, Yellow and Red, but you can use any colors. Briefly stir the oil and food coloring mixture with a fork. You want to break up the food coloring drops into smaller drops, but not thoroughly mix the liquid. Pour the oil and coloring mixture into th

Cool Simple Science Experiment

Image
Cool Simple Science Experiment ...... ......to do with the kids   What you need:   small bowl or lid for each kid toothpick for each kid milk dish soap food coloring   pour just enough milk into the lid to cover the bottom then add two or three drops of food coloring around the sides (see picture below)     Next, put dish soap on the end of a tooth pick (I use Shaklee dish wash concentrate - it is all natural, safe, nontoxic, and super concentrated!)    insert the toothpick with soap side down into the middle of the milk.  Hold the toothpick still and watch it swirl                 Even the two year old thought it was pretty cool!   We dumped ours out and done it a few times - the kids had so much fun choosing different color combinations.      

Christmas at the Kindred's

Image
At our house - we like to keep Christmas simple, relaxing, cozy and fun! Welcome ....... please step on inside....   I have a milkjug at the entrences to the house and shop - I love the look and change out the ribbon and plants every season! I love our fireplace - we use it for all our heat. Every year at Christmas and Easter, we take our family pic by it. (All the picture frames are second hand, which I cover in twigs from the trees) Our tree - I don't like cluttered, so we mostly do lights, and tinsel with just a few bulbs and a handful of orniments - I hang christmas cards and photos on the back of the cupboards in the dinning room - when I was a kid, my mom would hang them on the doorways - I know to some, it may seem sloppy, but I like walking by and seeing family and friends for the month of Dec.! the garland and lights on the kiten banister match/wrap around to the ones on the fireplace mantle - The kids make gin